Reuse skeletons for Unity LODGroup
Written by Jesper Tingvall, Product Expert, Simplygon
Disclaimer: This post is written using version 10.0.8200.0 of Simplygon and Unity 2021.3.4f1. If you encounter this post at a later stage, some of the API calls might have changed. However, the core concepts should still remain valid.
Introduction
In this holiday blog post we'll showcase how to reuse skeletons for different LOD levels in Unity. As an extra spice we will also throw in Bone Reduction for our last LOD level.
Prerequisites
This blog focuses on a Unity specific problem. To solve it in our current Unity plugin we need to do some workarounds which this blog will detail. This is something we hope to adress in a future Unity plugin update.
This blog is recomended to combine with our other Unity blog Using Simplygon with Unity LODGroups so the entire process can be automated via scripting. However, for this blog we will just focus on the skeletal reassigning part. Thus the resulting script will require the user to use the Simplygon UI to create the LOD levels and assign them to a LODGroup manually.
Problem to solve
We have a skinned character in our Unity game and want to create a LOD chain for it. We want to use the same shared skeleton for all different LOD levels as this makes it easier to animate, as well as being more efficent and clean.
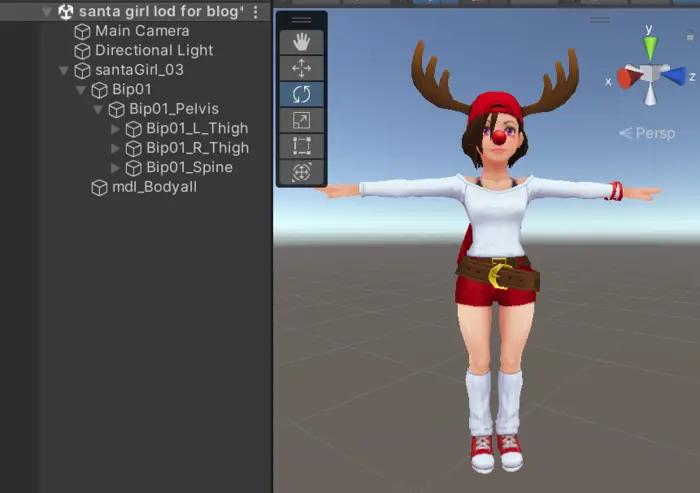
Solution
Currently our Simplygon plugin does not reuse the existing skeleton but create it's own for each LOD step. We are going to introduce a helper function which assigns it back.
Add menu function
To make it easy to access the function we are going to add a menu item for it. This can in Unity easily be achieved via appending MenuItem before a static function.
[MenuItem("Simplygon/Tools/Reassign skeleton")]
static void ReassignSkeleton()
{
To choose what SkinnedMeshRenderer to process we can use Selection.objects to get the currently selected objects in the editor. To differ between original and target we will introduce a convention that the target should have it's rootBone set to Null. This is something which the use needs to do manually before calling the script. If the function was used in a scripted pipeline of course this step would not be needed.
    if (Selection.objects.Length == 2)
    {
        SkinnedMeshRenderer target = null;
        SkinnedMeshRenderer original = null;
        foreach (var selectedObject in Selection.objects)
        {
            var selectedGameObject = selectedObject as GameObject;
            if (selectedGameObject)
            {
                var skinnedRenderer = selectedGameObject.GetComponent<SkinnedMeshRenderer>();
                if (skinnedRenderer)
                {
                    if (skinnedRenderer.rootBone)
                        original = skinnedRenderer;
                    else
                        target = skinnedRenderer;
                }
            }
        }
Once when we have found two SkinnedMeshRenderers, one target and one original we can trigger our main function for reassigning the skeleton. We also add some helpful text if the user has selected the wrong objects, or forgot to set one of the rootBones to Null.
        if (target && original)
        {
            ReassignSkeleton(target, original);
        } else
        {
            Debug.LogError("Please select two Skinned Mesh Renderers, where target renderer has root bone set to null");
        }
    }
    else
    {
        Debug.LogError("Two Skinned Mesh Renderers needs to be selected.");
    }
}
The end result is a nice little menu item on top bar we can trigger the script from.

Reassign skeleton
The core function will map the bones from original SkinnedMeshRenderer to target SkinnedMeshRenderer using the names of the bones. Thus it is important that we do not change the names of bones after processing them, nor use space in names as Simplygon will replace these with underscore characters.
We start by creating a dictionary containing all bones from original SkinnedMeshRenderer where name of bone is key.
private static void ReassignSkeleton(SkinnedMeshRenderer targetSkinnedRenderer, SkinnedMeshRenderer originalSkinnedRenderer)
{
    // Gets all bones from original skinned mesh renderer
    Dictionary<string, Transform> originalBoneMap = new Dictionary<string, Transform>();
    foreach (Transform bone in originalSkinnedRenderer.bones)
        originalBoneMap[bone.gameObject.name] = bone;
After that we can create a new bone list for our target SkinnedMeshRender. Then for each bone we currently have assigned in target, we will find the corresponding bone in originalBoneMap we created above using it's name. Lastly we assign the newly created bone list to our target.
    // Create a new bone list for target skinned renderer and maps it via names to original bones
    Transform[] newBones = new Transform[targetSkinnedRenderer.bones.Length];
    for (int i = 0; i < targetSkinnedRenderer.bones.Length; ++i)
    {
        GameObject bone = targetSkinnedRenderer.bones[i].gameObject;
        if (!originalBoneMap.TryGetValue(bone.name, out newBones[i]))
        {
            Debug.LogWarning("Unable to find bone \"" + bone.name + "\" on original skeleton.");
        }
    }
    targetSkinnedRenderer.bones = newBones;
Lastly we assign the same rootBone as originalSkinnedRenderer as well as moving it to the same parent.
    // Assigns target skinned mesh renderer to same parent and root bone as original
    targetSkinnedRenderer.rootBone = originalSkinnedRenderer.rootBone;
    targetSkinnedRenderer.transform.parent = originalSkinnedRenderer.transform.parent;
}
Generating LODs
When we have the helping script functions in place we can start to generate the LODs we will assign to them. We will create a 2 step cascaded LOD chain in the Simplygon Plugin's UI using following settings:
LOD1
Advanced Reduction pipeline with settings set to:
Reduction Target Triangle Ratio = FalseReduction Target On Screen Size = 200
LOD2
For LOD2 we will also start to simplify the skinning of the mesh using our Bone reducer. We will let it automatically find what bones that can be ignored. Pipeline is an cascaded Advanced Reduction pipeline with settings set to:
Reduction Target Triangle Ratio = FalseReduction Target On Screen Size = 50Use Bone Reducer = TrueBone Reduction Target One Screen Size = 50
After processing the LOD pipelines we get two new objects in our scene.
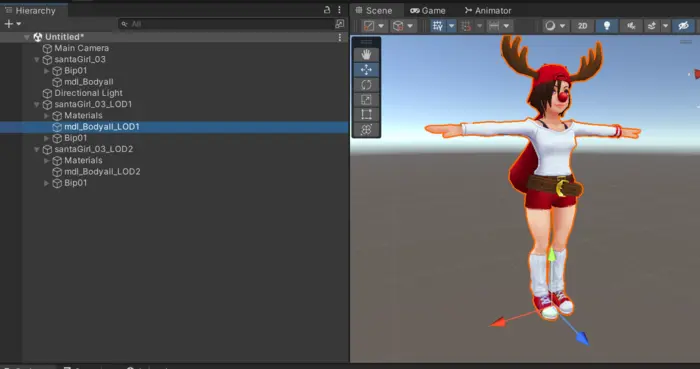
We will clean up components from the USD importer by removing any USDPrimSource components from the SkinnedMeshRenderers. The previously refered blog post Using Simplygon with Unity LODGroups contain a CleanUpUSDComponents script which can be used as well.
Assigning LODs to LODGroup
To be able to use our script we first need to set the target's rootBone to Null.
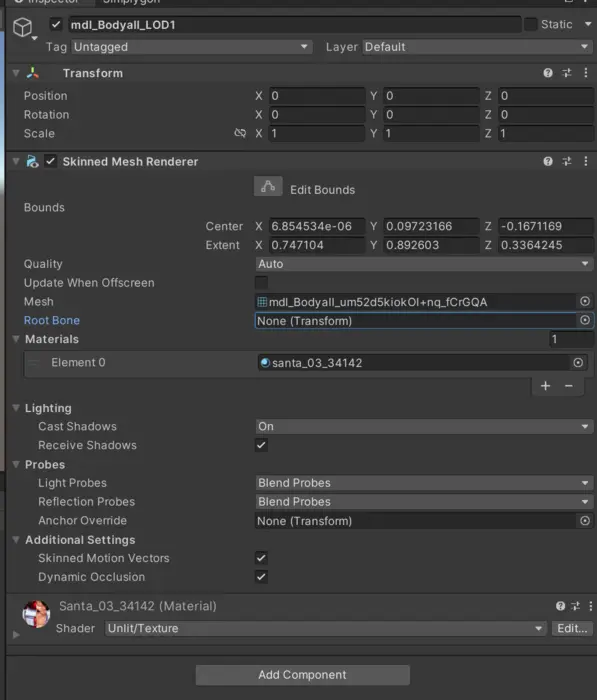
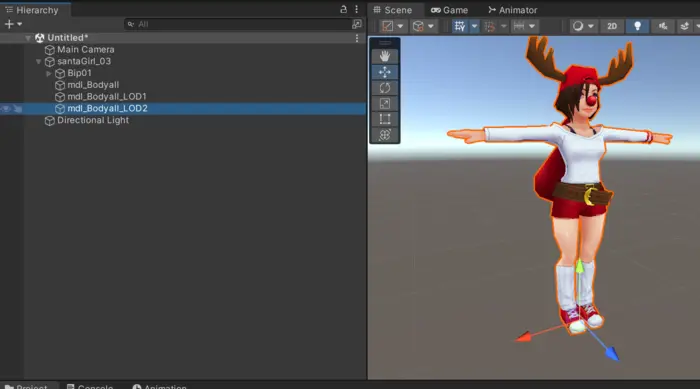
We will also rename the SkinnedMeshRenderers properly so we can keep track of them by appending _LOD1 and _LOD2.
After that we can select the original SkinnedMeshRender and one of the newly created LOD's SkinnedMeshRenderer and then trigger our script via Simplygon->Tools->Reassign skeleton. We do this for both created LODs.
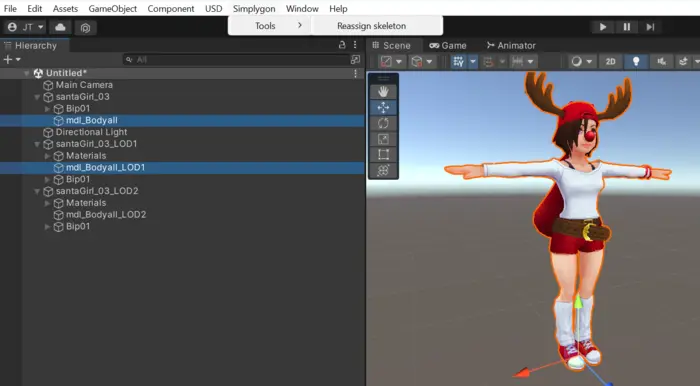
After reassigning the skeleton we can delete the other generated objects in our scene.
Simplygon's screen size is very conservative and guarantees less than one pixel error at the given screen size. In many cases get away with one or more pixels of errors. In this case we will allow up to 4 pixels errors.
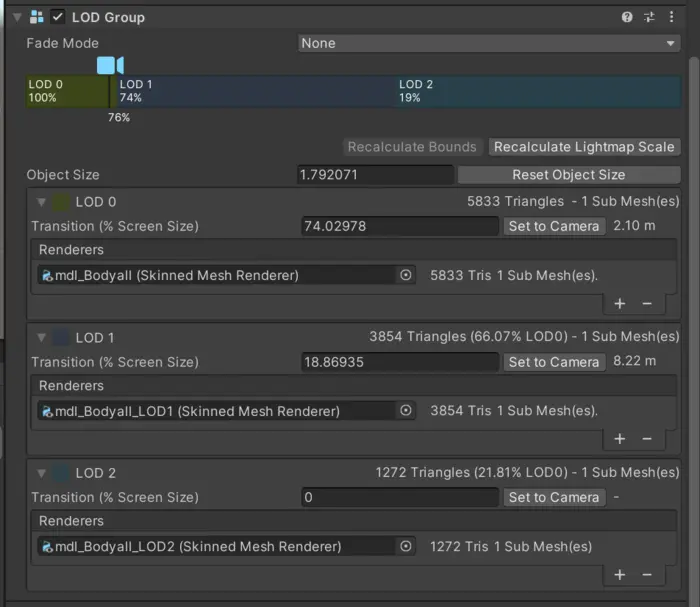
Unity's LODGroup choose which LOD level to display by how much percentage of the screen height it covers. If we assume that our game will be ran at 1920x1080 the LOD levels will be assigned accordingly.
- We created LOD1 for a screen size of 200. This means it should be displayed at
200 / 1080 * 4 = 74%. - We created LOD2 for a screen size if 50. This means it should be displayed at
50 / 1080 * 4 = 19%.
We set these values in the LODGroup component and assign our LOD0, LOD1 and LOD2 SkinnedMeshRenderers.
Result
The result is a 3 step LOD chain where LOD 1 is a simple reduction and LOD 2 has a simpler skinning binding.
| LOD level | Triangles |
|---|---|
| LOD0 (Original) | 5 833 |
| LOD1 | 3 854 |
| LOD2 | 1 272 |
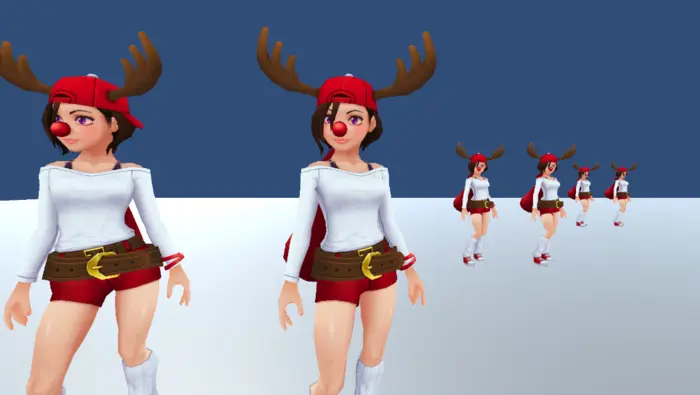
Here is a comparison image where one of the characters have LODs enabled and other one is in LOD0. Is it left or right that is original? Who knows, I will not tell you.
Complete script
// Copyright (c) Microsoft Corporation.
// Licensed under the MIT license.

using UnityEditor;
using UnityEngine;
using System.Collections.Generic;

namespace Simplygon.Examples.UnitySkinRebinding
{
    public class SkinnedMeshSkeletonRebinding
    {

        [MenuItem("Simplygon/Tools/Reassign skeleton")]
        static void ReassignSkeleton()
        {
            if (Selection.objects.Length == 2)
            {
                SkinnedMeshRenderer target = null;
                SkinnedMeshRenderer original = null;
                foreach (var selectedObject in Selection.objects)
                {
                    var selectedGameObject = selectedObject as GameObject;
                    if (selectedGameObject)
                    {
                        var skinnedRenderer = selectedGameObject.GetComponent<SkinnedMeshRenderer>();
                        if (skinnedRenderer)
                        {
                            if (skinnedRenderer.rootBone)
                                original = skinnedRenderer;
                            else
                                target = skinnedRenderer;
                        }
                    }
                }

                if (target && original)
                {
                    ReassignSkeleton(target, original);
                } else
                {
                    Debug.LogError("Please select two Skinned Mesh Renderers, where target renderer has root bone set to null");
                }
            }
            else
            {
                Debug.LogError("Two Skinned Mesh Renderers needs to be selected.");
            }
        }

        private static void ReassignSkeleton(SkinnedMeshRenderer targetSkinnedRenderer, SkinnedMeshRenderer originalSkinnedRenderer)
        {
            // Gets all bones from original skinned mesh renderer
            Dictionary<string, Transform> originalBoneMap = new Dictionary<string, Transform>();
            foreach (Transform bone in originalSkinnedRenderer.bones)
                originalBoneMap[bone.gameObject.name] = bone;


            // Create a new bone list for target skinned renderer and maps it via names to original bones
            Transform[] newBones = new Transform[targetSkinnedRenderer.bones.Length];
            for (int i = 0; i < targetSkinnedRenderer.bones.Length; ++i)
            {
                GameObject bone = targetSkinnedRenderer.bones[i].gameObject;
                if (!originalBoneMap.TryGetValue(bone.name, out newBones[i]))
                {
                    Debug.LogWarning("Unable to find bone \"" + bone.name + "\" on original skeleton.");
                }
            }
            targetSkinnedRenderer.bones = newBones;

            // Assigns target skinned mesh renderer to same parent and root bone as original
            targetSkinnedRenderer.rootBone = originalSkinnedRenderer.rootBone;
            targetSkinnedRenderer.transform.parent = originalSkinnedRenderer.transform.parent;
        }
    }
}
