A simple reduction script in Unity
Disclaimer: The code in this post is written on version 9.1 of Simplygon. If you encounter this post at a later stage, some of the API calls might have changed. However, the core concepts should still remain valid.
Introduction
There are often cases where we need to do some kind of customization to our assets, adapt the asset so that it fits into the current workflow, works with the tools and game engine in the way it is supposed to. As Unity supports scripting in C# it is the perfect candidate to utilize the Simplygon C# API, which brings us to the topic of this blog post, namely 'A simple reduction script in Unity. In this blog post we will show you how to set up and access the Simplygon API as well as create a simple reduction, all from within a C# script in Unity.
Along with the release of the new Simplygon Unity plug-in (included in Simplygon 9.1) there has been some fundamental changes. A major change is that the Simplygon Unity-plug-in now uses USD (Pixar's Universal Scene Description) as intermediate file format (and therefor requires the Unity USD 2.0.0 package to be installed). This means that we do no longer have a direct conversion to and from the Unity scene format. The new import / export pipeline is Unity ↔ Unity USD ↔ Simplygon, which also means that we are following the rules of USD. Let us move on to prerequisites and we'll fill you in later!
Prerequisites
This example will utilize a scene import / export that is part of the Simplygon Unity- plug-in, while this is not required it is recommended to get the most consistent results compared to the plug-in. Other options are; write your own scene importer / exporter (Unity ↔ Simplygon), or use Unity USD directly (Unity ↔ USD ↔ Simplygon). Please follow the installation instructions to make sure both the Simplygon Unity plug-in and Unity USD 2.0.0 are installed properly.
Creating a C# script in Unity
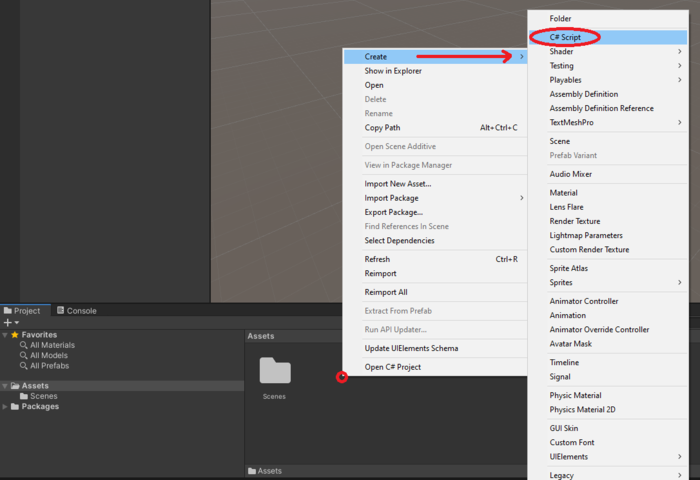
The starting point of this example will be an empty Unity project so let's boot up Unity. The next step is to create a Unity C# Script by right-clicking in the asset manager then Create → C# Script.
Now, let's rename the file to something more describing, for example 'ASimpleReductionScript.cs', then double-click to open it. This action will open the file in the default editor, which in our case is Visual Studio (any other text editor will work as well, but code completion might be preferable). We can now see that there is generated content in our file, we are not really interested in per frame updates in this example, so go ahead and delete the Start- and Update methods in the file. What remains is a class with the same name as the project, you may rename it to 'ASimpleReductionScript' for traceability. The class inherits from 'MonoBehaviour' which is required, let's keep it as it is.
Let's create a method named 'EntryPoint', a static method with return type 'void', as the name suggests this will be the entry point of our script. For easier access we can expose this method as a menu item inside Unity, this can be achieved by adding the 'MenuItem' attribute on the line above the method definition, the argument of MenuItem is of type string which defines the menu path of the menu item. In this case we'll use Simplygon → ASimpleReductionScript.
using UnityEditor;
using UnityEngine;

public class ASimpleReductionScript : MonoBehaviour
{
    [MenuItem("Simplygon/ASimpleReductionScript")]
    void EntryPoint()
    {

    }
}
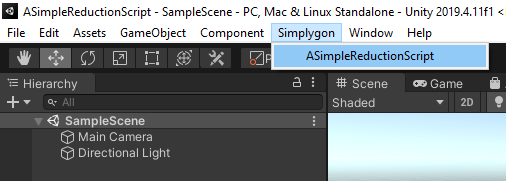
Now save the script and go back to Unity, we should now be able to see a menu named 'Simplygon' containing a menu item named 'ASimpleReductionScript', we'll refer to this with Simplygon → ASimpleReductionScript from here on.
Initialize Simplygon
Now that we have a basic script template to work with, let's add the initialization of Simplygon inside the EntryPoint method. The Simplygon API expose a global loader which contains the initialization method (InitSimplygon). The initialization method will return a simplygon handle if the initialization succeeds, the error code will then be NoError. If the initialization fails the information will get stored in error code and error message that was provided by the user. See Simplygon initialization (C#) for more details.
ISimplygon simplygon = global::Simplygon.Loader.InitSimplygon(out EErrorCodes simplygonErrorCode, out string simplygonErrorMessage)
Let's add the Simplygon initialization to our EntryPoint method.
using Simplygon;

static void EntryPoint()
{
    using (ISimplygon simplygon = global::Simplygon.Loader.InitSimplygon
    (out EErrorCodes simplygonErrorCode, out string simplygonErrorMessage))
    {
        if (simplygonErrorCode == Simplygon.EErrorCodes.NoError)
        {
            // do Simplygon things here...
        }
        else
        {
            Debug.Log("Initializing failed!");
        }
    }
}
Now that Simplygon is up and running, let's move on to scene export.
Export selection
Simplygon, from a integration's point of view, usually works on the current selection in the scene. In this part we'll add pieces of code that checks if there is a selection, and if so pass that selection to a place holder method named 'Reduce' which takes a GameObject and ISimplygon as input.
static void EntryPoint()
{
    if (Selection.objects.Length > 0)
    {
        using (ISimplygon simplygon = global::Simplygon.Loader.InitSimplygon
        (out EErrorCodes simplygonErrorCode, out string simplygonErrorMessage))
        {
            if (simplygonErrorCode == Simplygon.EErrorCodes.NoError)
            {
                foreach (var o in Selection.objects)
                {
                    Reduce(o as GameObject, simplygon);
                }
            }
            else
            {
                Debug.Log("Initializing failed!");
            }
        }
    }
}

public static void Reduce(GameObject gameObject, ISimplygon simplygon)
{
    // handle selection...
}
We are now ready to expand our 'Reduce' method. The first step will be to export the incoming GameObject, including all children. This is where the helper functions provided by the Simplygon Unity plug-in comes in. If you remember what we talked about earlier about Unity ↔ Unity USD ↔ Simplygon this will be the time where we export the Unity scene (or branch of the scene) to USD. As the Simplygon Unity plug-in and Unity USD plug-in are installed we can utilize the SceneExporter that we use in the Simplygon UI.
The declaration of the SimplygonExporter is:
namespace Simplygon.Unity.EditorPlugin
{
    public static class SimplygonExporter
    {
        public static spScene Export(ISimplygon simplygon, string tempDirectory, List<GameObject> selectedGameObjects);
    }
}
Which means that we need to include the 'Simplygon.Unity.EditorPlugin' namespace, then use the SimplygonExporter.Export method to export a GameObject's branch / hierarchy to file (USD). The 'Export' method returns a Simplygon scene, which is what we are after (as it can be used throughout the Simplygon API), no further import step is required. If we take a closer look at the declaration we see that we need the simplygon handle, a temporary directory (for the resulting USD file) and a list of GameObjects, let's make the appropriate adjustments to our Reduce method. We are using another Simplygon Unity-plugin class named SimplygonUtils to give us a unique temporary directory, this is of course optional.
public static void Reduce(GameObject gameObject, ISimplygon simplygon)
{
    List<GameObject> selectedGameObjects = new List<GameObject>();
    selectedGameObjects.Add(gameObject);

    string exportTempDirectory = SimplygonUtils.GetNewTempDirectory();
    using (spScene sgScene = SimplygonExporter.Export(simplygon, exportTempDirectory, selectedGameObjects))
    {
        // do some work on sgScene here...
    }
}
There we go, we now have a Simplygon scene that is ready to be used, let's move on to optimization!
Optimization
Now that we have the Simplygon scene we need to describe what kind of optimization we want to do. In Simplygon we have something called Pipelines (or Pipeline objects) where each one encapsulates different kinds of processors, optimization settings and execution methods. Some common types of pipelines are the ReductionPipeline, AggregationPipeline and RemeshingPipeline. The purpose of the Pipeline system is to make the life easier for users by providing functionality driven by settings rather than coding. In this example we will do a simple reduction of 50% of the original triangle count. To avoid as much low level coding as possible we will utilize the ReductionPipeline, it provides the functionality we are after and is fairly easy to configure.
Let's create a ReductionPipeline in the scope of sgScene (the scene will be needed later), if we look at the ReductionSettings exposed by the pipeline we can see that there indeed is a ReductionTargetTriangleRatio setting, set it to 0.5f for a 50% reduction. There is also a SetReductionTarget method which purpose is to set the condition of when to stop the optimization, this method is combining multiple API calls into one. See EStopCondition and SetReductionTargets for more details. For now we set the stop condition to 'All' and enable UseTriangleRatio (first flag), the remaining flags should be set to false.
using (spReductionPipeline reductionPipeline = simplygon.CreateReductionPipeline())
using (spReductionSettings reductionSettings = reductionPipeline.GetReductionSettings())
{
    reductionSettings.SetReductionTargets(EStopCondition.All, true, false, false, false);
    reductionSettings.SetReductionTargetTriangleRatio(0.5f);
}
So how do we use these settings to actually perform the optimization? As we mentioned earlier pipelines also include functionality for execution, more specifically a method named RunScene. The method takes a Simplygon scene as well as a pipeline run mode, the first one we already have, the second one can be set to different modes depending on configuration, but in this example we'll use RunInThisProcess. See EPipelineRunMode for more execution options.
reductionPipeline.RunScene(sgScene, EPipelineRunMode.RunInThisProcess);
Let's see what we have accomplished so far.
public static void Reduce(GameObject gameObject, ISimplygon simplygon)
    {
        List<GameObject> selectedGameObjects = new List<GameObject>();
        selectedGameObjects.Add(gameObject);

        string exportTempDirectory = SimplygonUtils.GetNewTempDirectory();

        using (spScene sgScene = SimplygonExporter.Export(simplygon, exportTempDirectory, selectedGameObjects))
        {
            using (spReductionPipeline reductionPipeline = simplygon.CreateReductionPipeline())
            using (spReductionSettings reductionSettings = reductionPipeline.GetReductionSettings())
            {
                reductionSettings.SetReductionTargets(EStopCondition.All, true, false, false, false);
                reductionSettings.SetReductionTargetTriangleRatio(0.5f);

                reductionPipeline.RunScene(sgScene, EPipelineRunMode.RunInThisProcess);
            }
        }
    }
When the optimization has completed the pipeline will hold the optimized scene(s). Let's move on to import!
Import optimized asset
The pipeline that triggered the optimization through RunScene will also be the pipeline that holds the optimized scene(s). To directly import the optimized scenes into Unity, lets utilize SimplygonImporter.Import (provided by Simplygon Unity plug-in). The arguments for Import are the Simplygon handle, the pipeline holding the optimized scene(s), initial LOD index, (Unity) asset folder path and the name of imported object (once inside Unity).
For the import paths we will simply use 'AssetDatabase' as it will handle name clashes and indexing. We'll place the result in the projects Asset/SimpleReductions folder, as well as use the original selected node name (Import will append '_LODX' prefix).
string baseFolder = "Assets/SimpleReductions";
if (!AssetDatabase.IsValidFolder(baseFolder))
{
    AssetDatabase.CreateFolder("Assets", "SimpleReductions");
}

string assetFolderGuid = AssetDatabase.CreateFolder(baseFolder, gameObject.name);
string assetFolderPath = AssetDatabase.GUIDToAssetPath(assetFolderGuid);
We now have the necessary information for the SimplygonImporter.Import method.
int startingLodIndex = 0;
SimplygonImporter.Import(simplygon, reductionPipeline, ref startingLodIndex, assetFolderPath, gameObject.name);
This is the updated Reduce method.
public static void Reduce(GameObject gameObject, ISimplygon simplygon)
{
    List<GameObject> selectedGameObjects = new List<GameObject>();
    selectedGameObjects.Add(gameObject);

    string exportTempDirectory = SimplygonUtils.GetNewTempDirectory();

    using (spScene sgScene = SimplygonExporter.Export(simplygon, exportTempDirectory, selectedGameObjects))
    {
        using (spReductionPipeline reductionPipeline = simplygon.CreateReductionPipeline())
        using (spReductionSettings reductionSettings = reductionPipeline.GetReductionSettings())
        {
            reductionSettings.SetReductionTargets(EStopCondition.All, true, false, false, false);
            reductionSettings.SetReductionTargetTriangleRatio(0.5f);

            reductionPipeline.RunScene(sgScene, EPipelineRunMode.RunInThisProcess);

            string baseFolder = "Assets/SimpleReductions";
            if (!AssetDatabase.IsValidFolder(baseFolder))
            {
                AssetDatabase.CreateFolder("Assets", "SimpleReductions");
            }

            string assetFolderGuid = AssetDatabase.CreateFolder(baseFolder, gameObject.name);
            string assetFolderPath = AssetDatabase.GUIDToAssetPath(assetFolderGuid);

            int startingLodIndex = 0;
            SimplygonImporter.Import(simplygon, reductionPipeline, ref startingLodIndex, assetFolderPath, gameObject.name);
        }
    }
}
Optimized asset
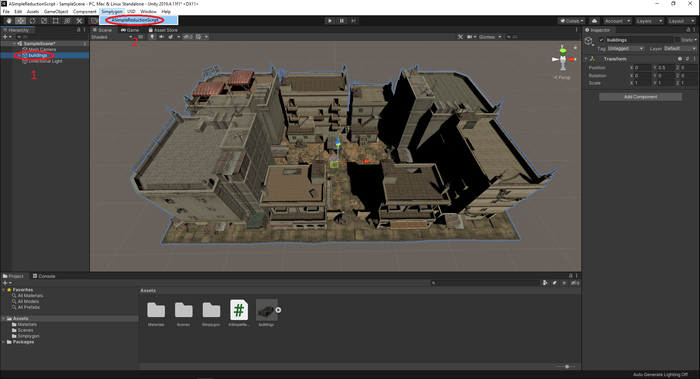
That is it, let's go back to Unity, import an asset, select the object(s) and run the script. In this example we will use the city block in the image below, a quite complex asset with many meshes, materials and textures,
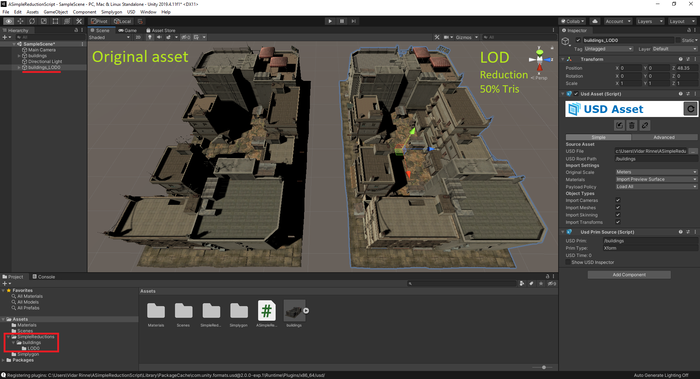
Once the optimization has completed the optimized asset will get imported back to the scene. See the result in the image below, the original asset to the left, the optimized asset to the right.
If possible, try this example with various different pipelines and settings!
Complete script
using Simplygon;
using Simplygon.Unity.EditorPlugin;
using System.Collections.Generic;
using UnityEditor;
using UnityEngine;

// main class that inherits from MonoBehaviour (required for scripts)
public class ASimpleReductionScript : MonoBehaviour
{
    // the entry point of the script that does a pre-check on selection
    // and which initializes Simplygon, also exposes method as menu item.
    [MenuItem("Simplygon/ASimpleReductionScript")]
    static void EntryPoint()
    {
        // are there any objects selected in the scene?
        if (Selection.objects.Length > 0)
        {
            // if so, initialize Simplygon
            using (ISimplygon simplygon = global::Simplygon.Loader.InitSimplygon
                (out EErrorCodes simplygonErrorCode, out string simplygonErrorMessage))
            {
                // if Simplygon handle is valid, loop all selected objects
                // and call Reduce function.
                if (simplygonErrorCode == Simplygon.EErrorCodes.NoError)
                {
                    foreach (var o in Selection.objects)
                    {
                        Reduce(o as GameObject, simplygon);
                    }
                }

                // if invalid handle, output error message to the Unity console
                else
                {
                    Debug.Log("Initializing failed!");
                }
            }
        }
    }

    // this method is responsible for reducing a branch in the selected scene,
    // including conversion to and from the Simplygon scene format.
    public static void Reduce(GameObject gameObject, ISimplygon simplygon)
    {
        // put GameObject in a list (required for SimplygonExporter.Export)
        List<GameObject> selectedGameObjects = new List<GameObject>();
        selectedGameObjects.Add(gameObject);

        // generate unique temp directory
        string exportTempDirectory = SimplygonUtils.GetNewTempDirectory();

        // Export the currently selected scene branch to temp directory and recieve sgScene
        using (spScene sgScene = SimplygonExporter.Export(simplygon, exportTempDirectory, selectedGameObjects))
        {
            // set up and configure ReductionPipeline
            using (spReductionPipeline reductionPipeline = simplygon.CreateReductionPipeline())
            using (spReductionSettings reductionSettings = reductionPipeline.GetReductionSettings())
            {
                reductionSettings.SetReductionTargets(EStopCondition.All, true, false, false, false);
                reductionSettings.SetReductionTargetTriangleRatio(0.5f);

                // execute Pipeline on the given scene, run optimization in this process
                reductionPipeline.RunScene(sgScene, EPipelineRunMode.RunInThisProcess);

                // make sure target import location exists
                string baseFolder = "Assets/SimpleReductions";
                if (!AssetDatabase.IsValidFolder(baseFolder))
                {
                    AssetDatabase.CreateFolder("Assets", "SimpleReductions");
                }

                // create target import folder
                string assetFolderGuid = AssetDatabase.CreateFolder(baseFolder, gameObject.name);
                string assetFolderPath = AssetDatabase.GUIDToAssetPath(assetFolderGuid);

                // Import optimized scene(s) in pipeline into Unity
                int startingLodIndex = 0;
                SimplygonImporter.Import(simplygon, reductionPipeline, ref startingLodIndex, assetFolderPath, gameObject.name);
            }
        }
    }
}