Simple hollow shell script
Disclaimer: The code in this post is written on version 9.0.7700 of Simplygon. If you encounter this post at a later stage, some of the API calls might have changed. However, the core concepts should still remain valid.
Overview
In this post we will show you how to create a simple python script that generates a hollow shell.
What is a Hollow Shell?
With Simplygon 9 we released a new feature which is based on the aggregation processor. We call the result from this process, a Hollow Shell. In cases where you can't use the remesher, as it requires new materials, the hollow shell can be used as a good alternative. The resulting object will have all the internal geometry removed, as with the remesher. It isn't affecting the exterior nor require you to create new material. You can combine this processor with the reducer if you want to also reduce the poly count for the exterior. Optionally, you can choose to merge all materials onto one atlas. The advantage of the aggregation processor is that it can use the chart aggregator, which uses the original charts and can keep overlapping UV's intact. Here is a video showing the resulting what the result looks like.
Cases where the Hollow Shell is useful
In cases where you are combining pieces to create larger objects, i.e. kitbashing workflows, the hollow shell can help reduce the internal geometry that isn't visible from the outisde. As the process doesn't affect the exterior geometry the resulting object can be used close to the camera.
It can also be used to simplify an object that you need the exterior of. For example, a complete car with engine and all other details that you don't need for an exterior representation.
What will we do?
We will create a python script that transform the object below to an object where the internal geometry is removed and the bottom of the object is clipped by the box.
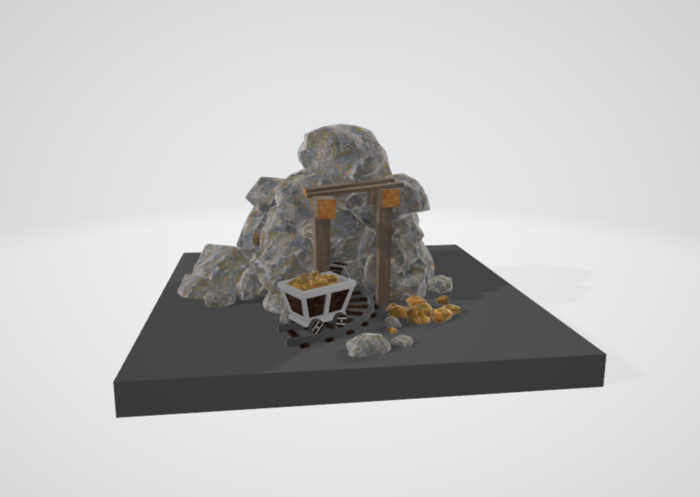
This will be the result of the process.
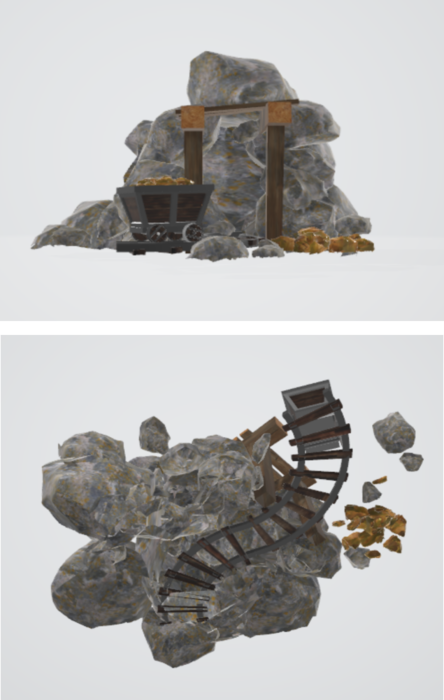
In this specific case the object is reduced from 136k polys to 90k, without affecting the exterior of the object.
The script
Starting point
First we need to set up the skeleton of the script. This is the code for that:
from simplygon import simplygon_loader
from simplygon import Simplygon

def main():
    sg = simplygon_loader.init_simplygon()
    process_file(sg, <source file>, <output file>)
    del sg

if __name__== "__main__":
    main()
Now we need to define the processing function, which is responsible for loading the file, initializing the processing and save out the result.
def process_file(sg, asset_file, output_file):
    # Load the asset we want to process
    scene_importer = sg.CreateSceneImporter()
    scene_importer.SetImportFilePath(asset_file)
    if scene_importer.RunImport():
        # Process the asset
        optimized_scene = run_hollow_shell(sg, scene_importer.GetScene())
        # Export the hollow shell into the output file.
        scene_exporter = sg.CreateSceneExporter()
        scene_exporter.SetExportFilePath(output_file)
        scene_exporter.SetScene(optimized_scene)
        scene_exporter.RunExport()
Setting up and running the aggregation processor
The run_hollow_shell function called in the above script will do the handle all the settings and also run the processor.
def run_hollow_shell(sg, scene):
    print("Creating the hollow shell...")
    # The hollow shell is achieved through using the aggregation pipeline
    # with some specific settings
    aggregation_pipeline = sg.CreateAggregationPipeline()
    aggregator_settings = aggregation_pipeline.GetAggregationSettings()
    # Setting geometry culling will remove internal geometry
    aggregator_settings.SetEnableGeometryCulling(True)
    # The higher precision the longer the process will take,
    # but more internal geometry will be removed.
    aggregator_settings.SetGeometryCullingPrecision(0.2)
    # We want the resulting geometry to merged into one mesh
    aggregator_settings.SetMergeGeometries(True)
    # Set up the clipping geometry and processing set.
    setup_clipping_geometry(sg, scene, aggregation_pipeline)
    # Now we can run the processing.
    print("Running aggregation process...")
    aggregation_pipeline.RunScene(scene, Simplygon.EPipelineRunMode_RunInThisProcess)
    print("Done")
    return scene
In order to trigger the geometry culling we need to set EnableGeometryCulling to true. Using the precision setting gives us a lever between 0 and 1 that balances amount of culled geometry and processing speed, where 1 will maximize the amount culled.
Since we want to clip the bottom of the object with the ground geometry we also need to tell the pipeline which geometry is what. This we will do in setup_clipping_geometry. If you don't need that part, feel free to just remove that line and skip the next section.
Sorting clipping and processing geometry
The final step is to create the function that sorts out which geometry should be processed and which should be used to clip with. How to decide what belongs to what set is up to you. In this simple example we rely on naming. Any object starting with "clipgeom" is assumed to be used for clipping the result.
Here is the function that sets up pipeline with the selection sets that decides what is what.
def setup_clipping_geometry(sg, scene, aggregation_pipeline):
    # Create sets for processing and clipping geometries
    clipping_set = sg.CreateSelectionSet()
    process_set = sg.CreateSelectionSet()
    # Add the sets to the scene we're working on
    clipping_set_id = scene.GetSelectionSetTable().AddSelectionSet(clipping_set)
    process_set_id = scene.GetSelectionSetTable().AddSelectionSet(process_set)
    # Fill the sets with the correct geometries
    fill_selection_sets(scene.GetRootNode(), process_set, clipping_set)
    # Instruct the processor to use the sets we just added to the scene
    aggregation_pipeline.GetAggregationSettings().SetProcessSelectionSetID(process_set_id)
    culling_settings =  aggregation_pipeline.GetGeometryCullingSettings()
    culling_settings.SetUseClippingGeometry(True)
    culling_settings.SetClippingGeometrySelectionSetID(clipping_set_id)
Finally, here is the naive function we use in this example to decide which objects should be used as clipping geometry.
def fill_selection_sets(scene_node, process_set, clipping_set):
    # Loop through all the nodes in the scene
    for i in range(0, scene_node.GetChildCount()):
        child = scene_node.GetChild(i)
        # We only care about meshes
        if child.IsA("ISceneMesh"):
            # Any object that starts with clipgeom is assumed to belong
            # to the clipping geometry.
            if child.GetName().startswith("clipgeom"):
                clipping_set.AddItem(child.GetNodeGUID())
            else:
                process_set.AddItem(child.GetNodeGUID())
        # Continue digging for geometries in the scene
        fill_selection_sets(child, process_set, clipping_set)
Summary
This a simple script that allows you to create a cheap representation of kitbashed collection of objects. it can be helpful in many scenarios where you have a lot of geometry that is just there, but never visible to the spectator.
Here is the script in its entirety.
# Copyright (c) Microsoft Corporation.
# Licensed under the MIT license.
from simplygon import simplygon_loader
from simplygon import Simplygon

# Function that separates geometry to be included in the result and
# from geometry that should be used to clip the result.
def fill_selection_sets(scene_node, process_set, clipping_set):
    # Loop through all the nodes in the scene
    for i in range(0, scene_node.GetChildCount()):
        child = scene_node.GetChild(i)
        # We only care about meshes
        if child.IsA("ISceneMesh"):
            # Any object that starts with clipgeom is assumed to belong
            # to the clipping geometry.
            if child.GetName().startswith("clipgeom"):
                clipping_set.AddItem(child.GetNodeGUID())
            else:
                process_set.AddItem(child.GetNodeGUID())
        # Continue digging for geometries in the scene
        fill_selection_sets(child, process_set, clipping_set)

def setup_clipping_geometry(sg, scene, aggregation_pipeline):
    # Create sets for processing and clipping geometries
    clipping_set = sg.CreateSelectionSet()
    process_set = sg.CreateSelectionSet()
    # Add the sets to the scene we're working on
    clipping_set_id = scene.GetSelectionSetTable().AddSelectionSet(clipping_set)
    process_set_id = scene.GetSelectionSetTable().AddSelectionSet(process_set)
    # Fill the sets with the correct geometries
    fill_selection_sets(scene.GetRootNode(), process_set, clipping_set)
    # Instruct the processor to use the sets we just added to the scene
    aggregation_pipeline.GetAggregationSettings().SetProcessSelectionSetID(process_set_id)
    culling_settings =  aggregation_pipeline.GetGeometryCullingSettings()
    culling_settings.SetUseClippingGeometry(True)
    culling_settings.SetClippingGeometrySelectionSetID(clipping_set_id)

# Function that sets up the hollow shell processing.
def run_hollow_shell(sg, scene):
    print("Creating the hollow shell...")
    # The hollow shell is achieved through using the aggregation pipeline
    # with some specific settings
    aggregation_pipeline = sg.CreateAggregationPipeline()
    aggregator_settings = aggregation_pipeline.GetAggregationSettings()
    # Setting geometry culling will remove internal geometry
    aggregator_settings.SetEnableGeometryCulling(True)
    # The higher precision the longer the process will take,
    # but more internal geometry will be removed.
    aggregator_settings.SetGeometryCullingPrecision(0.2)
    # We want the resulting geometry to merged into one mesh
    aggregator_settings.SetMergeGeometries(True)
    # Set up the clipping geometry and processing set.
    setup_clipping_geometry(sg, scene, aggregation_pipeline)
    # Now we can run the processing.
    print("Running aggregation process...")
    aggregation_pipeline.RunScene(scene, Simplygon.EPipelineRunMode_RunInThisProcess)
    print("Done")
    return scene


def process_file(sg, asset_file, output_file):
    # Load the asset we want to process
    scene_importer = sg.CreateSceneImporter()
    scene_importer.SetImportFilePath(asset_file)
    if scene_importer.RunImport():
        # Process the asset
        optimized_scene = run_hollow_shell(sg, scene_importer.GetScene())
        # Export the hollow shell into the output file.
        scene_exporter = sg.CreateSceneExporter()
        scene_exporter.SetExportFilePath(output_file)
        scene_exporter.SetScene(optimized_scene)
        scene_exporter.RunExport()


def main():
    sg = simplygon_loader.init_simplygon()
    process_file(sg, <source file>, <output file>)
    del sg

if __name__== "__main__":
    main()