How animation hides LOD Transitions
Written by Jesper Tingvall, Product Expert, Simplygon
Disclaimer: The code in this post is written using version 10.4.199.0 of Simplygon and Unity 6.0. If you encounter this post at a later stage, some of the API calls might have changed. However, the core concepts should still remain valid.
Introduction
In this blog post, we will investigate how animations affect LOD transitions. According to our results from our small sample set, we can switch around 2-4 times closer to the camera if an object is animated compared to when it is static.
Prerequisites
This example will use the Simplygon plugin for Unity, but the same concepts can be applied to all other integrations of the Simplygon API.
Experiment setup
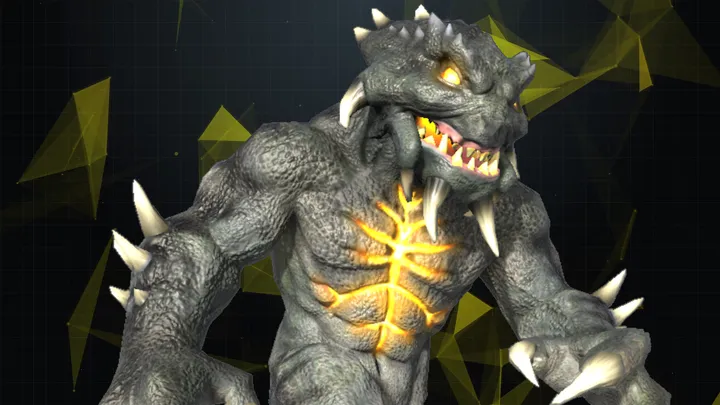
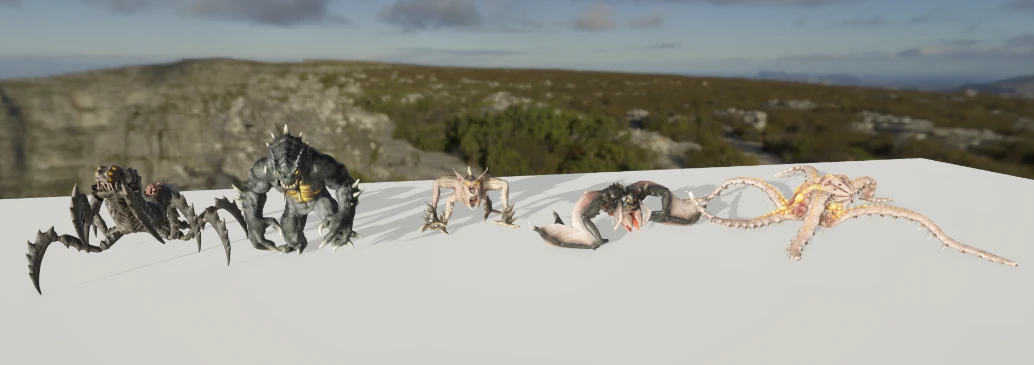
We want to explore how LOD transitions are affected by animations. We will test this using these 5 animated monster models. All of them will use a walk or run forward animation. Monsters tend to rush forward towards the player in video games.
The result was rendered at 1920x1080 on an ordinary computer screen viewed from a distance of 1 meter. One person visually inspected the results to determine the LOD transition points.
Generate LOD models
We use the system from the Optimize Unity character prefabs blog post to generate LOD levels. We use the following settings. This translates to a triangle reduction configured with OnScreenSize target of 0.5 * 0.3 * 1080 = 162 pixels. We do quite aggressive optimization, in other words.

Experiment tool
These monsters are placed in a simple Unity project with the following features:
- The assets are placed in a simple environment with plain ground, skybox for reflections and a simple directional light.
- We have controls to move the camera in and out, toggle animation and switch models.
- We output the asset's current screen height in pixels and distance to camera.
- The asset constantly switches between the original model and generated LOD model.
The experiment works as follows. We move the camera as close as possible to the model until we can see the LOD pop when it switches the model back and forth. We find the breaking point both for when the model is animated and while it is static.
Results
We can start by looking at the results of our optimization. Running triangle reduction with a screen target of 162 pixels gives us these optimized models. We can see that we do quite hefty optimization on some of the assets. Using the optimized models as much as possible should give us a nice performance boost.
| Asset | Original triangle count | Optimized triangle count |
|---|---|---|
| Cavecrawler | 21 k | 9 k |
| Gorosaurus | 14 k | 6 k |
| Hellcreeper | 16 k | 5 k |
| Marhomorph | 15 k | 4 k |
| Tyranopode | 29 k | 7 k |
We can start with a disclaimer: the values in the next parts are obtained by visual inspection. That means they are subjective and there are a number of technical factors that can influence them, like quality of computer screen, screen brightness, screen resolution, and screen distance to observer's eyes. But on average, this should give us an indication of how animations influence LOD switching. Here are the values where it is not possible to detect a LOD switch when the model is animated compared to static.

| Asset | Animated Screen Height | Static Screen Height |
|---|---|---|
| Cavecrawler | 133 | 60 |
| Gorosaurus | 293 | 62 |
| Hellcreeper | 600 | 100 |
| Marhomorph | 80 | 31 |
| Tyranopode | 300 | 140 |
We can switch at around 2-4 times closer screen height when we animate the model compared to a static model. We can also see that Reduction's OnScreenSize does not tell the entire truth when it comes to performing LOD switches. Sometimes we get a model that can be used closer to the camera, while in other cases we can see a small LOD pop. This is mostly due to differences in normals.
Another way to measure this is by camera distance. Here we can switch around 2-4 times earlier when we animate the model than if it is static.
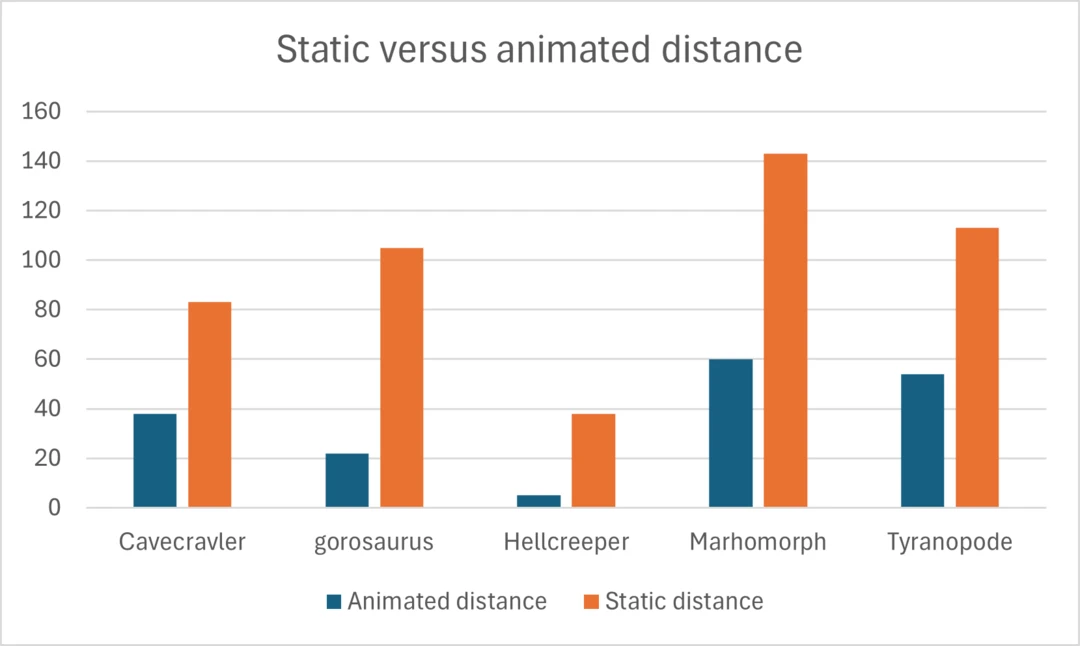
| Asset | Animated Distance | Static Distance |
|---|---|---|
| Cavecrawler | 38 | 83 |
| Gorosaurus | 22 | 105 |
| Hellcreeper | 5 | 38 |
| Marhomorph | 60 | 143 |
| Tyranopode | 54 | 113 |
Conclusions
So what conclusions can we make from this experiment?
- Animating a model makes it harder to spot a LOD transition. We did not encounter a case where animation makes LOD transitions easier to spot.
- OnScreenSize for reduction gives us a baseline for LOD quality. If we want to improve LOD quality, we need to investigate it in-engine and see how it looks with proper shaders and lighting.
- We can see that it is important to judge LOD transitions in the proper context. If our model is animated in-game, then we want it to be animated when we are inspecting the LOD switching. Ideally we should evaluate it using the most likely animation we player will encounter. If it is a sneaky enemy then it should be sneaking.
- For animated objects, we can in many cases skip cross-fading LOD transitions as the animations do a great job of hiding the transition.
- It is important to notice that we have only investigated LOD pops. We did not compare if the quality of the models was alright in detail. If we performed LOD0 optimization then we would never have a LOD pop between the original model and optimized one. This means we could potentially have optimized the model further.
We could also improve our LOD system by having it favor performing LOD switches when a character does a rapid movement. Or perhaps decide whether it should use a cross-fade LOD transition or perform a simple switch depending on whether the asset is currently being animated.
Next steps
As with most academic-oriented text, we end with "more research needed". We have now only investigated how animations affect LOD transitions. Here are some areas we think could be interesting to explore further:
- Our setup in this experiment was a computer screen. If our game primarily targeted consoles or handheld devices then the visual quality will likely differ due to variations in screen size, resolution, and viewing distance.
- In most cases, what introduces a LOD pop is the difference in normals. How visible this is depends on the scene's lighting. Scenes with uniform lighting (dark or bright) will make changes in normals less visible. Sharp lighting from few directions will make changes in normals more visible.
- How much an asset blends into the background, both color-wise and shape-wise, probably influences how visible a LOD pop is, especially along the silhouette.
- How camera movement (or asset movement) affects LOD transitions.
Complete script
The following script was used to evaluate the LOD transitions.
using UnityEngine;
using UnityEngine.UI;

public class LODEvaluation : MonoBehaviour
{
    public LODGroup[] LODPrefabs;
    public Transform SpawnPosition;
    public Transform CameraRoot;
    public Camera Camera;

    public float CameraSpeed;

    public float FlipTime;

    public int PrefabIndex;
    private LODGroup SpawnedPrefab;
    private int CurrentLODIndex;

    public Text StatisticText;

    void Start()
    {
        InvokeRepeating("FlipLOD", FlipTime, FlipTime);
    }

    public void FlipLOD()
    {
        CurrentLODIndex = (CurrentLODIndex + 1) % 2;
        if (SpawnedPrefab != null)
        {
            var lods = SpawnedPrefab.GetLODs();
            for (int i = 0; i < SpawnedPrefab.lodCount; i++)
            {
                SetLODEnabled(CurrentLODIndex == i, lods[i]);
            }
        }
    }

    public void SetLODEnabled(bool enabled, LOD lod)
    {
        foreach (var renderer in lod.renderers)
        {
            renderer.enabled = enabled;
        }

    }

    void Update()
    {
        if (Input.GetKey(KeyCode.W))
        {
            Camera.transform.localPosition += Vector3.back * Time.deltaTime * CameraSpeed;
        }
        else if (Input.GetKey(KeyCode.S))
        {
            Camera.transform.localPosition += Vector3.forward * Time.deltaTime * CameraSpeed;
        }

        if (Input.GetKeyDown(KeyCode.E))
        {
            if (SpawnedPrefab != null)
            {
                var animator = SpawnedPrefab.GetComponent<Animator>();
                animator.enabled = !animator.enabled;
            }
        }

        if (Input.GetKeyDown(KeyCode.R))
        {
            if (SpawnedPrefab != null)
            {
                Destroy(SpawnedPrefab.gameObject);
                SpawnedPrefab = null;
            }
            PrefabIndex = (PrefabIndex + 1) % LODPrefabs.Length;
            NextPrefab();
        }

        if (SpawnedPrefab != null)
        {
            float height = GetScreenHeight(SpawnedPrefab.gameObject, Camera);
            var dist = Vector3.Distance(Camera.transform.position, SpawnedPrefab.transform.position);
            StatisticText.text = $"<b>{SpawnedPrefab.name}</b>\nScreen Height: {height:F2}\nCameraDistance: {dist:F2}";
        }
    }

    public void NextPrefab()
    {
        SpawnedPrefab = Instantiate(LODPrefabs[PrefabIndex]);
        SpawnedPrefab.enabled = false;
    }

    public float GetScreenHeight(GameObject asset, Camera camera)
    {
        float topScreen = Mathf.NegativeInfinity;
        float bottomScreen = Mathf.Infinity;
        foreach (var renderer in asset.GetComponentsInChildren<Renderer>())
        {
            if (renderer.enabled)
            {
                Bounds bounds = renderer.bounds;

                Vector3 top = new Vector3(bounds.center.x, bounds.max.y, bounds.center.z);
                Vector3 bottom = new Vector3(bounds.center.x, bounds.min.y, bounds.center.z);

                Vector3 topScreenPoint = camera.WorldToScreenPoint(top);
                Vector3 bottomScreenPoint = camera.WorldToScreenPoint(bottom);

                if (topScreenPoint.y > topScreen)
                {
                    topScreen = topScreenPoint.y;
                }

                if (bottomScreenPoint.y < bottomScreen)
                {
                    bottomScreen = bottomScreenPoint.y;
                }
            }
        }

        float pixelHeight = Mathf.Abs(topScreen - bottomScreen);
        return pixelHeight;
    }
}