Control LOD switch distances in Simplygon's Unreal Engine plugin
In this blog, we'll explore how to control LOD switch distances in Unreal Engine when using Simplygon's LOD Recipes. We'll look at both automatically calculated switch distances and how to override these with manual switch distances when needed.
Disclaimer: The code in this post is written using version 10.4.391.0 of Simplygon and Unreal Engine 5.6. If you encounter this post at a later stage, some of the API calls might have changed. However, the core concepts should still remain valid.
Prerequisites
This example will use the Simplygon integration in Unreal Engine, but the same concepts can be applied to all other integrations of the Simplygon API for applications where similar calculations are used for LOD transitions.
LOD Recipe
In Simplygon's Unreal Engine plugin LOD Recipes are used to define how the LOD should be generated. Each LOD Recipe contains a list of static meshes, skeletal meshes and settings used for the different LODs.
The most common use case is to have a series of reduction pipelines, one for each LOD. However, it is also possible, and in some cases recommended, to finish off your LOD chain with either a remeshing pipeline or billboard cloud pipeline pipeline. The reason for this is that reduction pipelines cannot reduce the triangle count below a certain asset-specific threshold while maintaining visual quality.
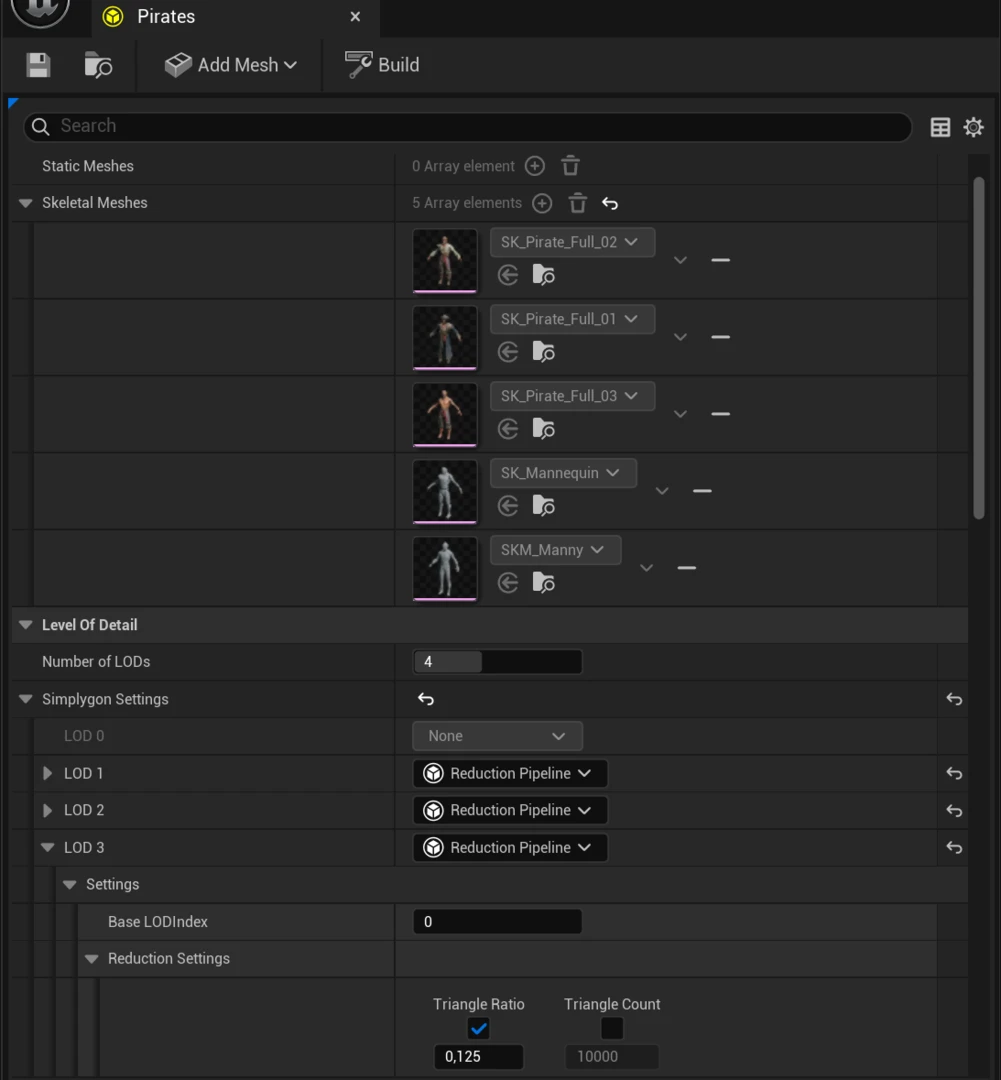
LOD recipes can be built either through the editor, Python scripting, or commandlets. This enables automatic LOD generation as part of your content pipeline.
Calculate Switch Size from Deviation
So, we can generate LODs, but how do we know when to switch between different LODs? In Unreal Engine, this is done by defining a relative screen size for each LOD level. When the object on screen reaches that size, the engine will switch to the corresponding LOD level.
In Simplygon, we have a function called GetCustomFieldMaxDeviation which measures the maximum deviation between the original mesh and the simplified mesh. When you run a reduction, remeshing, or billboard cloud pipeline, this field is populated with the maximum deviation value. You can use this value to calculate the appropriate screen size for the LOD transition.
This field is populated regardless of what reduction target you use. If you are using triangle ratio as the reduction target, you get the maximum introduced error. If you use max deviation as the reduction target, you get the maximum introduced error, which is quite close to your max deviation target.
In our Unreal Engine plugin, the maximum deviation is used by default to calculate the switch distance for each LOD level. A blog that examines this in more detail and explains how to do the calculations yourself for non-Unreal Engine projects can be found here: Calculating LOD transitions when using triangle ratio as reduction target.
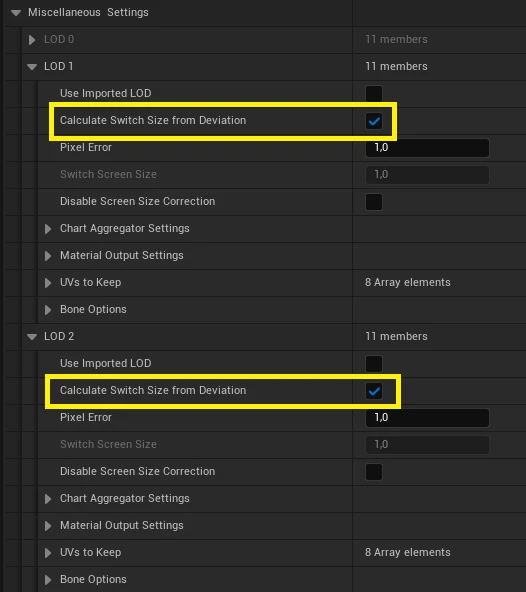
So, let's generate LODs for some character models using the standard 50% - 50% - 50% reduction pipeline, which we get when we create a new LOD recipe.
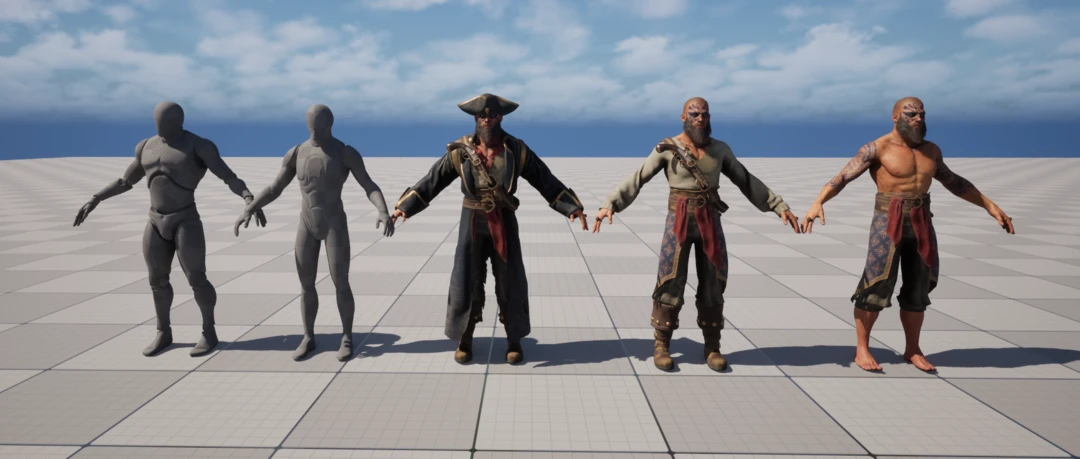
Here are the resulting switch distances. We can notice that each LOD level has a different switch distance. The pirate characters have quite close switching distances, since they are very similar. However, we get very different switch distances for the other two characters, even though we used the same reduction targets.
| Asset | LOD 1 Screen Size (50% reduction) | LOD 2 Screen Size (25% reduction) | LOD 3 Screen Size (12.5% reduction) |
|---|---|---|---|
| Mannequin | 0.22 | 0.12 | 0.06 |
| Manny | 0.47 | 0.35 | 0.23 |
| Pirate 01 | 0.40 | 0.21 | 0.12 |
| Pirate 02 | 0.43 | 0.23 | 0.14 |
| Pirate 03 | 0.34 | 0.18 | 0.10 |
As we can see, different assets have different switch distances, even though we used the same reduction targets. This is because the maximum deviation introduced by the reduction is different for each asset. This is why we don't recommend using triangle reduction as a reduction target. Instead, we suggest using either screen size or max deviation. More about this can be read in the blog What is the right reduction target for LOD creation.
Pixel Error
By default, we set the LOD switch so that we get a maximum of 1 pixel of error in the LOD switch. A pixel error of 1 is quite conservative, and in most cases you can go higher than that without the player noticing. You can often tolerate a pixel error of 3-5 pixels without LOD pops. If you go higher than that, you might start to see some popping, but this can be mitigated with cross-fading between LOD levels.
Let's increase the pixel error to 4 for every step in the LOD chain and see what effect this has on our LOD chain.
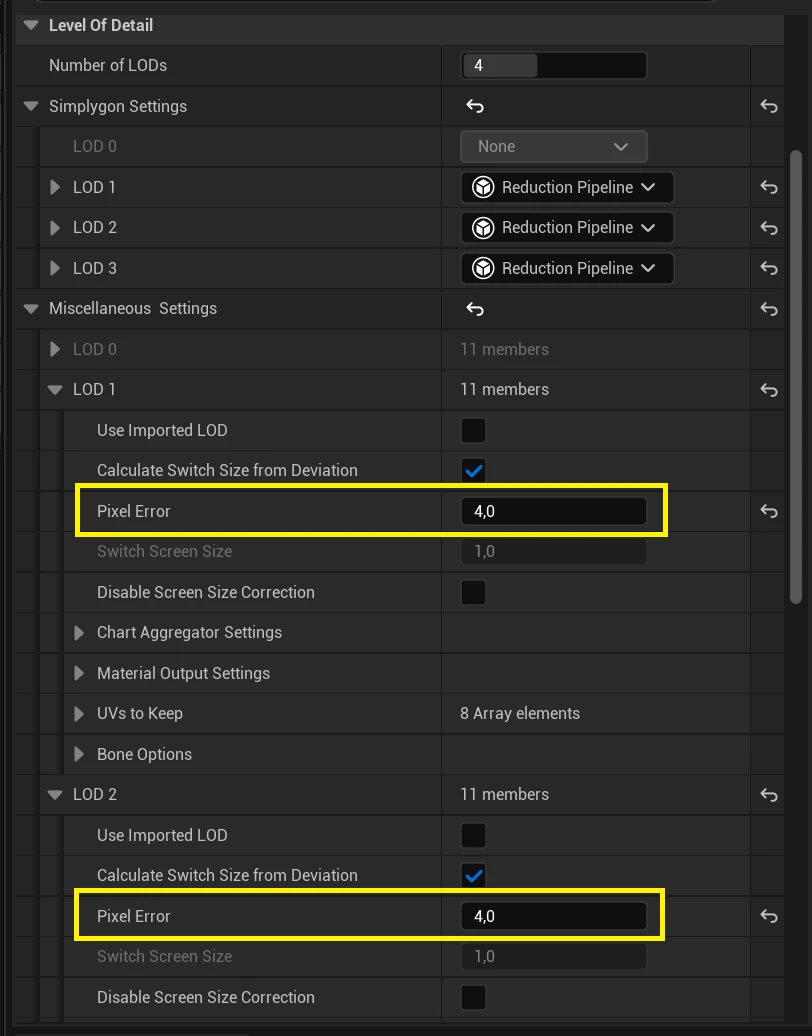
Let's compare the LOD switching behavior. It's important to note that we are still using the same LOD models; we have just changed the switch distances. Even with the more aggressive pixel error, it's very hard to notice the LOD transitions, and we can get a significant performance boost by using the lower LOD levels more aggressively.
Pixel Error = 1.0
Pixel Error = 4.0
The pace of your gameplay also impacts how much error you can get away with. If you have a very fast-paced game, the player won't have time to notice the LOD transitions as much, and you can get away with a higher pixel error. If you have a slower-paced game, the player will have more time to notice the LOD transitions, and you might want to use a lower pixel error. This is explored in the blog How animation hides LOD Transitions.
Pixel errors for billboard clouds
Billboard cloud pipelines work by projecting the original geometry onto a set of planes. The maximum deviation is calculated based on the original geometry. This means that the maximum deviation can be quite high, especially for vegetation assets where even a tiny leaf projected to a plane some decimeters away can cause a large deviation. This doesn't necessarily mean that the billboard cloud LOD will look bad. So for billboard clouds, we can set a high pixel error without visual impact.
Let's create a billboard cloud for a fence asset. We'll use these settings and a pixel error of 20.
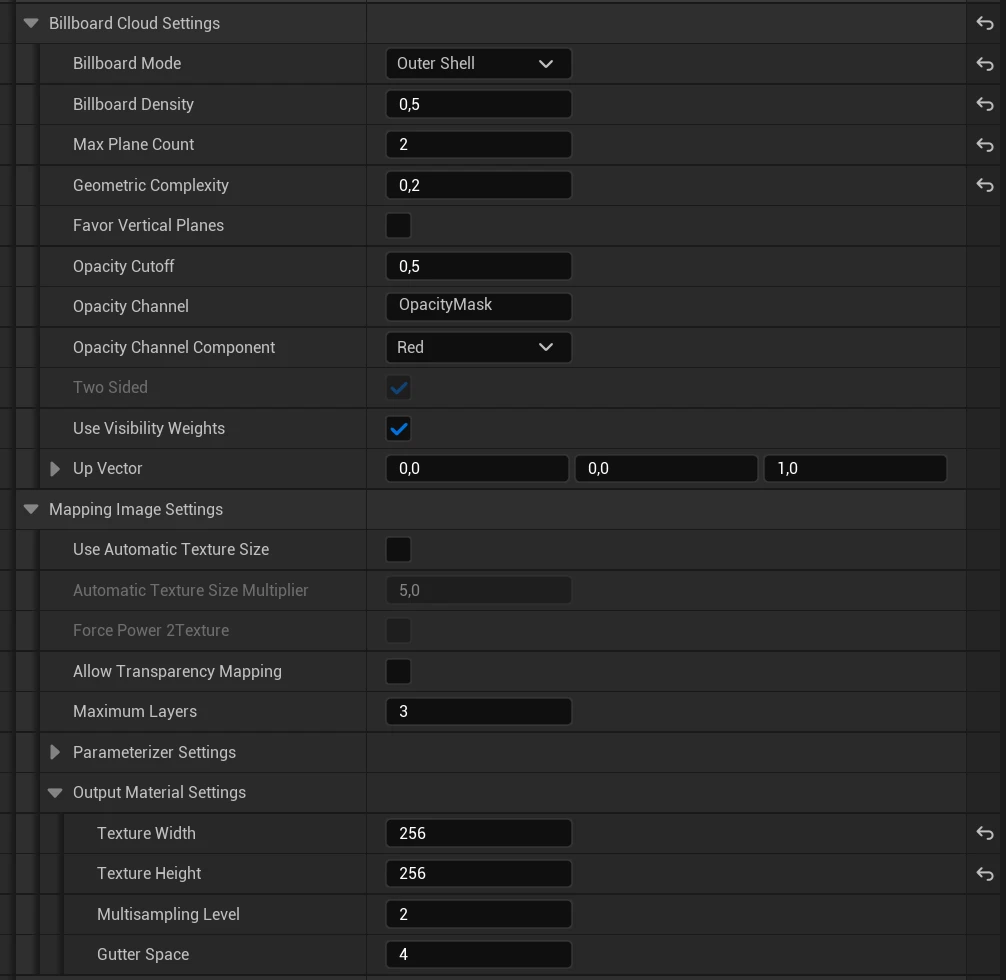
While 20 sounds like a very high pixel error, it actually results in only a small visual error.
Switch on Screen Size
It's also possible to directly specify at what screen size you want to switch between LOD levels. This is done by setting Calculate Switch Size From Deviation to false and then specifying Switch screen size for that LOD level. This is useful if you want to enforce that certain LOD levels, like remeshed proxies or billboard clouds, should only be used at a certain distance.
Setting a switch distance this way is needed if you are using a processor that doesn't report max deviation, such as the flipbook processor.
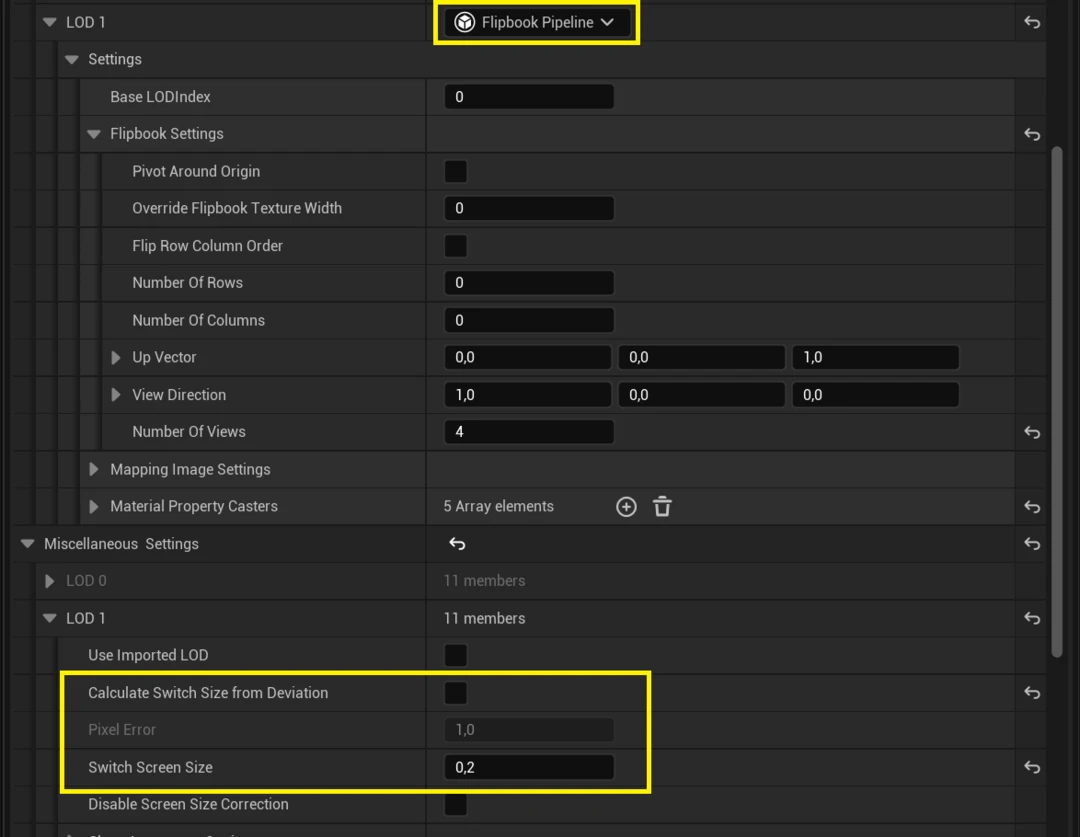
We have specified a switch screen size of 0.2; this is reflected in the video.
Finally, note that it's possible to use calculated switch distances for some LOD levels and manually specified switch distances for other LOD levels.
Conclusion
Understanding how to control LOD switch distances in Simplygon gives you the power to optimize your assets effectively while maintaining visual quality. Whether you use calculated distances based on pixel error or manually specify screen sizes, the key is finding the right balance between performance and visual fidelity for your specific game and target platform audience.